


Baking
#COOKING: FUNFETTI CORNFLAKE CRUNCH COOKIES RECIPE
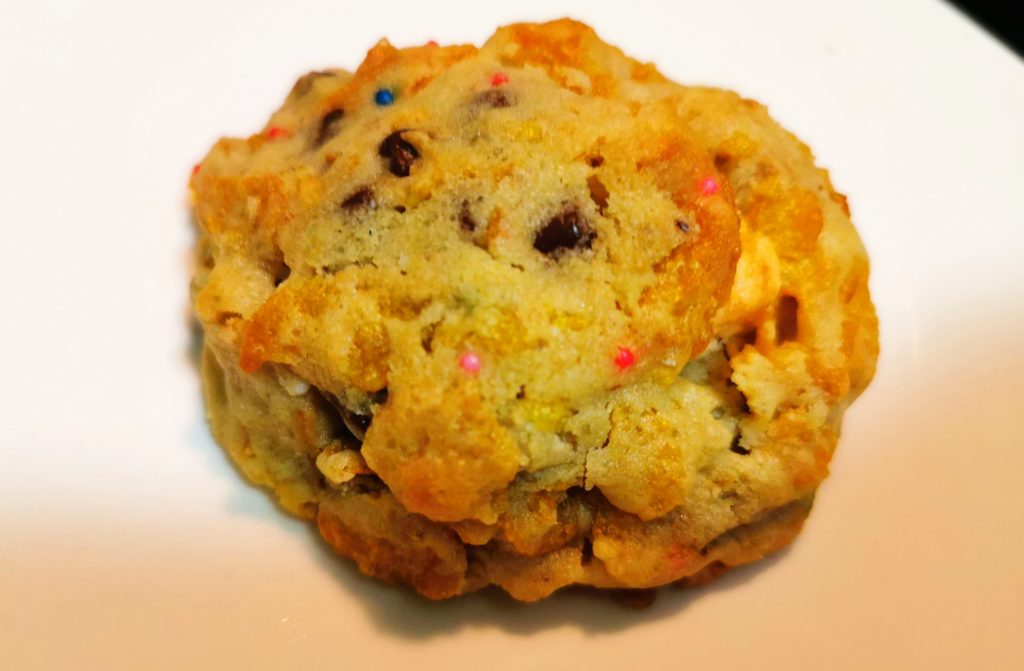
Funfetti Cornflake Crunch Cookies. Okay, full disclosure, these are very similar to those amazing cookies you find at Momofuku‘s Milk Bar, but we’ve added a Funfetti twist to it, because if you’re pulling out all the stops already and going over-the-top, you might as well go all the way! As usual, I reduce the sugar because the originals are way sweet and nobody has any business eating that much sugar.
Ingredients:
5 cups Corn Flakes
2 cups flour
1 1/4 cups unsalted butter at room temperature, cut into cubes
36 miniature marshmallows
3/4 cup miniature milk chocolate chips
1/3 cup organic raw sugar
1/3 cup brown sugar
3 tbsps sweetened condensed milk
2 tsps sea salt
1 tsp organic vanilla extract
1/2 tsp baking powder
1/4 tsp baking soda
1 egg
4 tbsps rainbow sprinkles
Instructions:
1. Place Corn Flakes, 3 tbsps sweetened condensed milk, 1/4 cup butter, 1/2 tsp salt and half of brown sugar on a baking tray. Bake at 300°F for 15 minutes. Set aside.
2. In large bowl, use handmixer to cream 1 cup butter and half of brown sugar and all of raw sugar. Mix till creamy for 2 minutes.
3. Add egg and vanilla, cream with handmixer for another 5 minutes.
4. In another bowl, mix flour, 1 1/2 tsps salt, baking powder and baking soda.
5. Slowly add-in flour mixture to butter mixture using handmixer. Mix for 1 minute.
6. Using spatula, fold-in chocolate chips, corn flake mixture and sprinkles. Mix gently till combined evenly.
7. Using hands, form dough into 12 large balls. Stuff each dough ball with 3 marshmallows. Place on parchment paper-lined tray and refrigerate for one hour.
8. Set oven at 370°F. Arrange dough balls about 3-4″ apart from one another on baking sheet. Bake 13-15 minutes till golden. Transfer to cooling rack and store in air-tight container. Makes 1 dozen.
Gallery:
(Photo credit: Mr. Will Wong)
#COOKING: LEVAIN BAKERY KNOCK-OFF COOKIES RECIPE

Levain Bakery Knock-off Cookies. Levain Bakery in New York City has gained international fame for its droolworthy 6 oz. cookies. They’re dense and an entire meal’s worth of calories and literally people queue hours still to this day at their four locations. They reassure everyone that they never run out of stock – you just basically have to wait. Many a savvy New Yorker have figured out that if you order via delivery, you can bypass the wait entirely. I can’t take credit for this recipe but MODERN HONEY selflessly has deciphered an approximation of their recipe and I am just adapting it to my tastes, cutting the sugar and nuts, keeping all that gooey chocolate in.
Ingredients:
3 cups flour2 cups milk chocolate chips
1 cup chopped walnuts, toasted
1 cup chilled butter, cut into small 1″ cubes
1/2 cup brown sugar
1/4 cup organic raw sugar
2 eggs
1 tsp corn starch
3/4 tsp baking soda
3/4 tsp sea salt
Instructions:
1. Pre-heat oven at 410°F.2. In large mixing bowl, combine butter with sugars using a fork till pasty. Finish and whip with handmixer for 1-2 minutes till creamy.
3. Add eggs one at a time.
4. Add salt, starch, baking soda and cream together.
5. Add flour and mix till just combined. Do not overmix.
6. Add nuts and chocolate and mix till even, again careful not to overmix.
7. Shape dough into 8 balls.
8. Grease cookie sheet lightly and bake in two batches, 10-12 minutes each batch. The originals are slightly under-baked but bake to the full 12 minutes if you like them firmer.
9. Let sit for 10 minutes at room temperature before transferring to cooling rack.
10. Store room temperature up to 3 days. Microwave 20 seconds to refresh.
Gallery:
(Photo credit: Mr. Will Wong)
#COOKING: AIR FRYER DOUGHNUTS (MAPLE-BACON, VANILLA SPRINKLE & CINNAMON-SUGAR) RECIPE
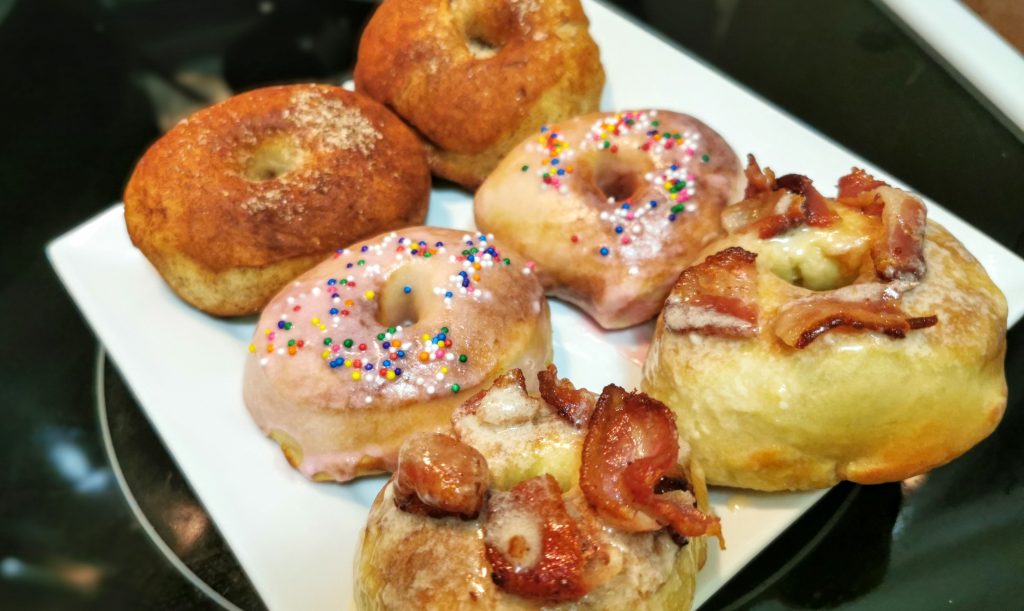
Air Fryer Doughnuts. We honestly cannot be trusted with our Ninja Kitchen Air Fryer! Nothing beats fresh doughnuts and these are a great way to start your day. We have three different versions for variety! This recipe yields 6-8 doughnuts and you can keep them out at room temperature in an air-tight container for 1-2 days. Just refresh in the microwave for about 10 seconds!
Doughnuts:
1 3/4 cups flour1/2 cup whole milk
1 egg
1/4 cup organic raw sugar
1 1/4 tbsps yeast
1/2 tsp sea salt
Coconut oil
Maple-Bacon Glaze:
1/2 cup + 3 tbsps icing sugar2 tbsps unsalted butter, room temperature
3 tbsps Canadian maple syrup
1 tsp vanilla extract
2-3 strips bacon, fried crisp and cut into small pieces to garnish
Vanilla Glaze:
1/2 cup + 3 tbps icing sugar2 tbsps unsalted butter, room temperature
1 tsp vanilla extract
2-3 drops red food colouring
Rainbow sprinkles to garnish
Cinnamon Sugar:
3 tbsps granulated organic sugar1/2 tsp cinnamon
Coconut oil to brush onto doughnuts so sugar adheres
Instructions:
1. In small bowl, heat milk till lukewarm (not too hot). Add 2 tbsps sugar and stir well. Mix-in yeast and let sit for about 10 minutes to activate.
2. Add 1 cup flour, egg, remaining sugar and salt into milk mixture, mixing with handmixer till smooth. Add remaining flour in and mix again till smooth. Add a small bit of flour in bit-by-bit if required till dough no longer sticks to bowl.
3. Turn onto flat, clean and floured surface and knead for about 6 minutes to elastic.
4. Coat clean large bowl with coconut oil and transfer dough ball into it. Cover with plastic wrap and place somewhere warm for 80-90 minutes till dough doubles in size.
5. Transfer dough again to flat, clean and lightly-floured surface and knead for another 5 minutes.
6. Roll dough flat to about 1/2″ thick. Use cutter to cut circles. Use smaller circle cutter to cut-out centers of doughnuts. You can re-shape that dough to make extra doughnuts or use as doughnut holes.
7. Place doughnuts on platter and cover with plastic wrap. Place somewhere warm to rise for 30 minutes more or if you like, refrigerate overnight.
8. Preheat Air Fryer on Air Fryer mode for 3 minutes at 350°F.
9. Brush doughnuts lightly with coconut oil. Divide doughnuts into 2 batches and fry 5 minutes each.
10. Prepare any or all of the glazes above in separate bowls, mixing till smooth.
11. Allow doughnuts to cool completely at room temperature (30 minutes) and dip into glazes. Garnish with respective toppings (sprinkles, bacon). If making Cinnamon-Sugar, brush doughnuts lightly with coconut oil and toss into a resealable storage bag to coat.
Gallery:
(Photo credit: Mr. Will Wong)
#COOKING: BLUEBERRY SCONES RECIPE
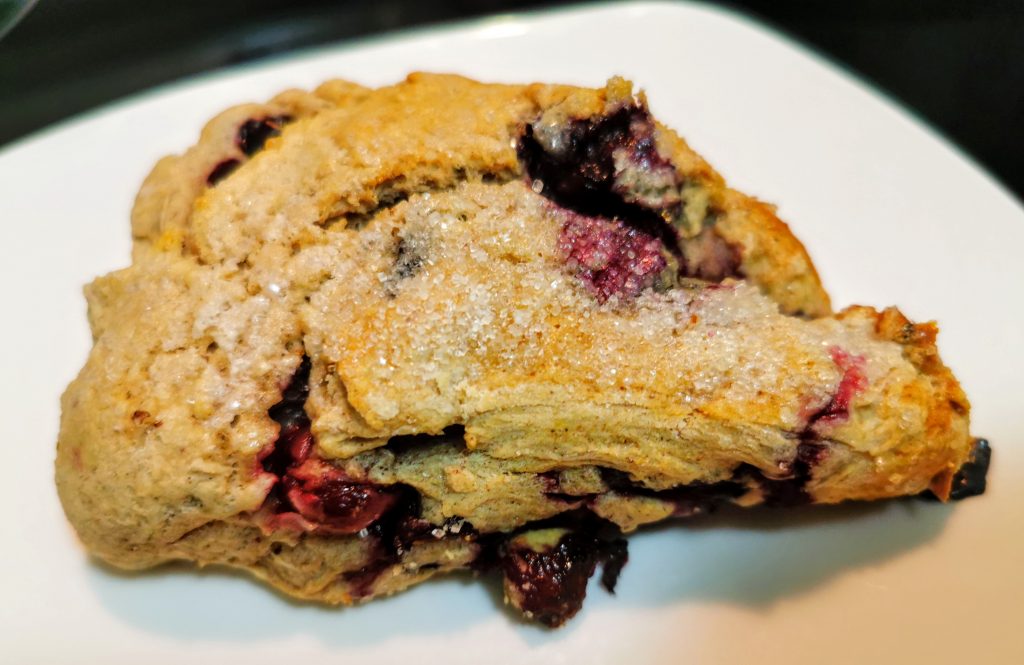
Blueberry Scones. Delicious doesn’t have to be complicated. These scones are the perfect breakfast or teatime snack. The fact that blueberries are so juicy and plump right now, you shouldn’t need butter or jam as these are perfect as is.
Ingredients:
2 cups flour (and more for kneading)
1 pint fresh blueberries
1 cup 18% cream
1 egg
½ cup unsalted butter, grated
6 tbsps organic raw sugar (or more if you like)
3 tsps baking powder
1 tsp cinnamon
1 tsp vanilla extract
½ tsp sea salt
Additional cream and sugar to brush and sprinkle on-top
Instructions:
1. In large mixing bowl, combine flour, salt, sugar, cinnamon and baking powder. Cut butter in using two knives till mixture resembles peas.
2. In separate bowl, whisk egg, cream and vanilla. Pour this over flour mixture.
3. Add blueberries, mixing gently till everything is just combined into a batter.
4. Gradually add a tablespoon of flour in until your mixture reaches the consistency of a dough, careful not to add too much flour.
5. Once firm enough, transfer to a flat, clean and floured surface to knead gently into a dough. Add flour bit by bit if required. Do not over-knead.
6. Form dough into a disc and take a clean knife, cutting into 8 triangles. Clean knife if it gets too sticky for a clean cut.
7. Pre-heat oven at 400°F and line baking sheet with parchment paper.
8. Place scones on parchment paper-lined tray or dish and put into your freezer for about 15 minutes.
9. Transfer scones to baking sheet and brush with cream. Sprinkle raw sugar on-top with a sieve.
10. Bake for 25 minutes approximately or till just golden. Once cooled, store in air-tight container room temperature for up to two days. These freeze well.
Gallery:
(Photo credit: Mr. Will Wong)
#COOKING: COCONUT CREAM PIE RECIPE

Coconut Cream Pie. This is a classic and it has been so liberating knowing now that making a pie crust isn’t so terrifying after all! Give this pie a little overnight patience. It is so worth it. Do be careful when baking this crust on its own, you need to weigh it down to prevent shrinkage.
Pie Pastry:
1 1/4 cups flour
3/4 tsp sea salt
1/4 cup butter, chilled
1/3 cup + 2 tbsps Crisco Golden All-Vegetable Shortening
1/4 cup cold water
Filling:
1 can coconut milk
1 cup half and half cream
4 egg yolks
1/2 cup organic raw sugar
1/2 cup shredded unsweetened coconut
1/4 cup corn starch
2 tbsps unsalted butter
1 tsp vanilla
2 tsps coconut extract
1/4 tsp sea salt
Topping:
1 cup whipping cream
3 tbsps icing sugar
1 tbsp coconut extract
2 tbsps shredded unsweetened coconut, toasted
Instructions:
1. Prepare pastry, combining ingredients, adding water 1 tbsp at a time, handling minimally. Knead dough gently on floured surface. Roll into ball. Chill minimum 2 hours, no more than 5 days.2. Roll dough out and fit into pie pan. Chill another 30 minutes.
3. Preheat oven to 400°F.
4. Place a small oven-safe plate stacked with small oven-safe bowl of water to weigh-down crust to prevent from shrinking.
5. Bake about 25 minutes or till golden brown.
6. Chill in refrigerator covered.
7. In bowl, mix yolks and corn starch.
8. On stove top with medium heat, melt butter, sugar, salt, cream and coconut milk, stirring frequently till it reaches boil.
9. Pour half of milk mixture into egg mixture and mix vigorously.
10. Pour mixture back into sauce pan with milk mixture. Stir till smooth as mixture will thicken fast. Remove from heat.
11. Mix-in butter, coconut and extracts.
12. Pour into pie crust and cover with Saran Wrap. It’s okay to have wrap touching filling. Chill overnight.
13. In large bowl, beat whipping cream with handmixer. Once stiff peaks form, use spatula to mix-in icing sugar and coconut extract.
14. Toast 2 tbsps coconut flakes, careful not to burn.
15. Pipe whipped cream onto pie. Sprinkle with coconut flakes and serve.
Gallery:
(Photo credit: Mr. Will Wong)
#COOKING: BOBA BUTTER TART PIE RECIPE
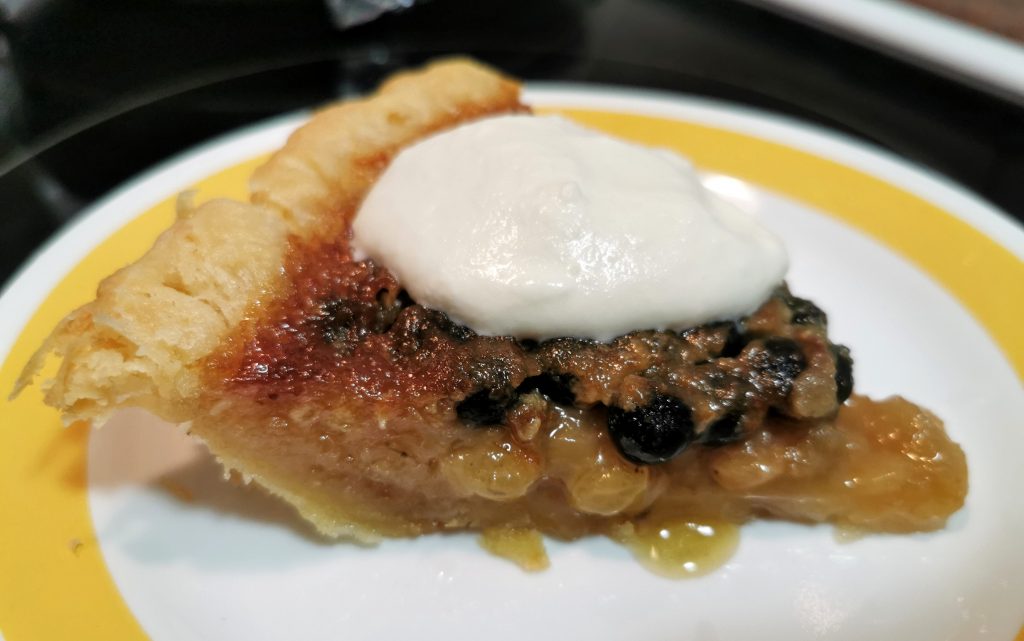
Boba Butter Tart Pie. Happy Canada Day! 🇨🇦 What better way to celebrate this wonderful country than an immersion of the classic Canadian Butter Tart and our favourite, Chatime Tea! Even if you can’t find those tea packets, use your favourite bold black tea.
Pie Pastry:
1 1/4 cups flour
3/4 tsp sea salt
1/4 cup butter, chilled
1/3 cup + 2 tbsps Crisco Golden All-Vegetable Shortening
1/4 cup cold water
Filling:
3/4 cup corn syrup
1/3 cup brown sugar
125g Instant Pearl Brown Sugar Tapioca
2 packets of Chatime Double Rich Roasted Milk Tea (or your favourite bold black tea)
1/2 cup raisins
1/4 cup butter
3 tbsps maple syrup
2 eggs
1/4 tsp sea salt
1/2 tsp vanilla extract
Whipped cream
Instructions:
1. Prepare pastry, combining ingredients, adding water 1 tbsp at a time, handling minimally. Knead dough gently on floured surface. Roll into ball. Chill minimum 2 hours, no more than 5 days.2. Roll dough out and fit into pie pan. Use fork to prick bottom of shell and crimp edges of crust. Chill another 30 minutes.
4. Soak raisins in warm water for about 10 minutes, drain.
5. Boil 1 cup water, soak two tea bags and add Instant Pearls. Soak 5 minutes and strain liquid. Mix pearls with raisins.
6. In sauce pan on medium-low heat, melt butter and mix with corn syrup, maple syrup, brown sugar, salt and vanilla till dissolved. Do not reach boiling point.
8. Line bottom of pie shell with raisins and tapioca mixture.
9. Pour butter-egg mixture over top.
11. Cool at room temperature minimum 3 hours. Store pie room temperature for up to three days. Reheat pie slices when ready to serve. Plate with a dollop of whipped cream.
Gallery:
(Photo credit: Mr. Will Wong)
#COOKING: CHOCOLATE FUDGE MACARONS RECIPE
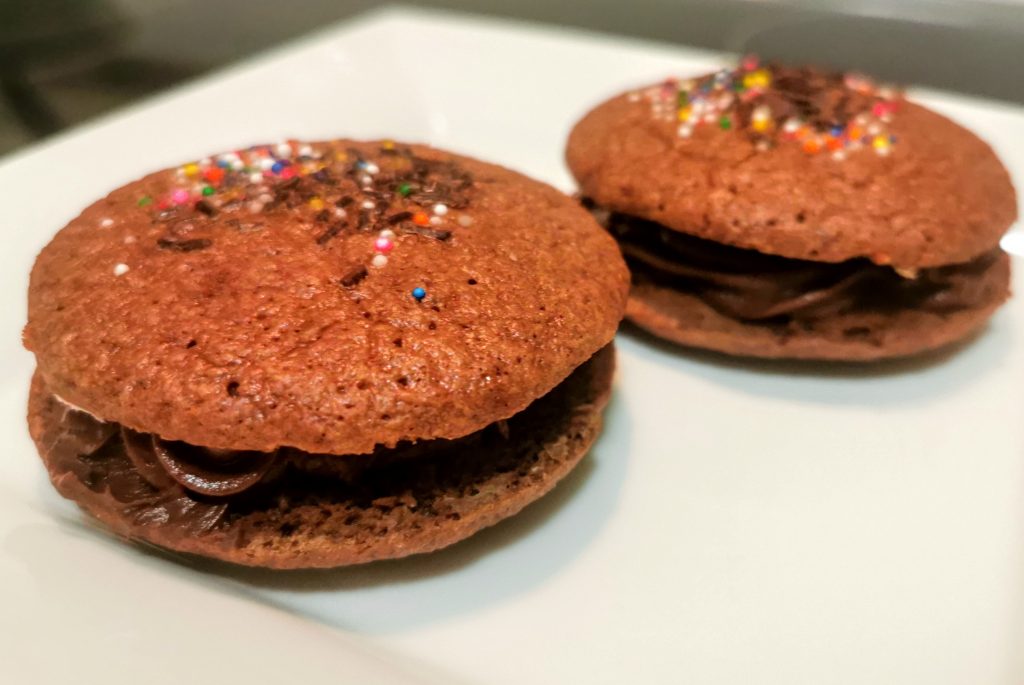
Chocolate Fudge Macarons. I was hesitant to try Macarons again since they gave me so much anxiety, but my dear friend Angela enjoyed the last batch I made so much, I couldn’t let her down! She literally said those were the best Macarons she’d ever had. She even went out of her way at nine months pregnant to buy me more Almond Flour so I could make more. Say what you will about the look of these which I know need a bit of work still in terms of piping, but they were phenomenal. That fudgy Butter Cream center is to die for.
Macarons:
1 cup Almond Flour, sifted three times
1 1/2 cups icing sugar, sifted three times
3 egg whites, room temperature
1/2 tsp vanilla extract
1 tsp sea salt
3 tbsps cocoa powder
1/2 cup unsalted butter, room temperature
1 1/2 cups icing sugar
6 tbsps cocoa powder
2 tbsps whipping cream
1/2 tsp vanilla extract
Chocolate/Rainbow Sprinkles for decoration
Instructions:
1. In large bowl, combine 1/2 tsp salt, almond flour, cocoa powder and icing sugar. Ensure these are all sifted three times.
2. In separate bowl, beat egg whites and 1/2 tsp salt with handmixer till stiff peaks form. You should be able to flip bowl over and nothing moves. Gradually add granulated sugar.
3. Add flour mixture into egg white mixture bit by bit and combine gently with spatula. When ready, you should be able to lift spatula and draw a “figure 8” with batter.
5. Scoop into piping bag with a circular tip and pipe each corner of baking sheet. Place parchment paper over it, using paste on corners to secure it.
6. Pipe Macaron batter evenly in circles over parchment paper. When done, take baking sheet and tap it on counter 3-5 times gently to rid of air bubbles and even out batter. Distribute sprinkles on-top.
7. Let sit for one hour.
8. Preheat oven at 300°F. Bake for 17-21 minutes depending how large your Macarons are. You’ll know they’re done when they don’t stick to the wax paper.
9. Allow to cool about 20 minutes out of oven and gently use spatula to remove from parchment paper and transfer to a tray. If they stick to paper, peel them off gently, taking a sparing amount of warm water and rub against back of cookie till paper peels off. Be gentle and do not over-wet.
10. Cool in fridge quickly for 20 minutes while you prepare Butter Cream.
11. Whip butter in large bowl till creamy. Add icing sugar, cocoa, vanilla and cream till you get a thick icing.
12. Scoop into piping bag and pipe onto “foot” of Macarons leaving a bit of space around the edge. Place another Macaron on-top and gently press into a sandwich.
13. Place in air-tight container overnight, room temperature before serving.
Gallery:
(Photo credit: Mr. Will Wong)
#COOKING: BEND & SNAPS RECIPE (“LEGALLY BLONDE”-INSPIRED FOR HOLLYWOOD SUITE’S “REEL MEALS”)

Bend & Snaps! Our friends at Hollywood Suite enlisted our help crafting a yummy Legally Blonde-inspired creation as part of their Reel Meals Series. We’re so thrilled to hear Mindy Kaling will be co-writing Legally Blonde 3, one of our favourite underdog stories of all time! How timely, especially since Legally Blonde will be premiering on Hollywood Suite June 28, 2020? Be sure to check-out their Blog for more movie-inspired delectables on their Blog here.

While cookies aren’t technically a meal, who doesn’t love a snack while watching a movie?
These ginger snaps not only are sinfully buttery and full of spicy sass, but they also can be dolled-up like Elle Woods would! We challenge you to break-out the sparkliest sprinkles and the hottest pink icing to pay tribute to one of our favourite on-screen heroines.
Ingredients:
2 cups flour
2/3 cup unsalted butter, softened
1/3 cup Crisco Golden
3/4 cup organic raw sugar
1 egg
1/4 cup molasses
3 tbsps candied ginger, chopped
1 tsp cinnamon
1/2 tsp allspice
1/4 tsp nutmeg
1 tsp ginger
1 tsp baking soda
1/2 tsp sea salt
1 tsp vanilla extract
Instructions:
1. Mix flour, spices, baking soda and salt together in one bowl.
2. Using handmixer, cream butter, shortening and 1/2 cup sugar. Add egg and vanilla, beating till creamy.
3. Add molasses and mix till combined, scraping sides of bowl occasionally.
4. Add flour mixture bit by bit with handmixer on low, combining fully.
5. Disperse candied ginger throughout cookie dough using hands. Shape dough into a ball, cover and refrigerate for minimum 1 hour.
6. Using food processor, take 1/4 cup sugar and grind for about a minute. Pour sugar in a shallow platter.
7. Preheat oven to 350°F.
8. After chilled, allow dough to stand room temperature till pliable (about 15 or more minutes). Roll dough into equal-sized balls.
9. Dip dough balls into sugar and place on parchment paper-lined cookie sheet. Dough should yield 20-24 cookies.
10. Bake 13-15 minutes depending how firm you want the cookie. When you see crinkles form, this means the cookies are done. Remove from oven.
11. Cool on sheet for about 20-30 minutes. Once fully cooled after minimum 1 hour, you may start dressing the cookies with icing and favourite Legally Blonde phrases and words like “Elle“, “Bruiser” and of course, “Bend” and “Snap“! These are fine in the fridge for a week or more.
(Photo credit: Mr. Will Wong/Hollywood Suite)
#COOKING: KEY LIME PIE RECIPE

Key Lime Pie. Summer’s back and this is my favourite pie of all time. Nothing compares to sweet and tart. Best of all, it is real simple and requires minimal baking! Now that’s our kind of pie!
Crust:
1 1/2 cups Graham Crumbs
1/4 cup unsalted butter, melted
1/2 cup organic raw sugar
Pie Filling:
1 cup sour cream
1 can sweetened condensed milk
8 limes, juiced (abt 2/3 cup)
Zest of 4 limes (put aside 1 tsp)
Topping:
1 cup whipping cream
1/4 cup icing sugar
1 tsp vanilla extract
Instructions:
1. Preheat oven to 375°F.
2. Mix Graham Crumbs, butter and sugar. Line pie dish with crumbs.
3. Bake 7 minutes, careful not to burn. Place in fridge, cool 30 minutes to an hour.
4. In large bowl, mix sour cream, condensed milk, zest and juice.
5. Preheat oven to 350°F.
6. Pour filling into crust. Bake 10 minutes.
7. Cool at room temperature for 30 minutes minimum and chill overnight.
8. Prepare topping by whipping cream with handmixer.
9. Fold-in icing sugar with vanilla extract, using spatula. Scoop into piping bag and pipe on top of pie. Sprinkle reserved zest.
(Photo credit: Mr. Will Wong)
#COOKING: MACARONS RECIPE

Macarons. Happy Pride! To celebrate inclusion and diversity, we thought we’d finally conquer our fear of baking Macarons. These gave me major anxiety but I am pleased with the results first time out. Pride is about being fearless, being accountable and embracing yourself and all your flaws. While these weren’t perfect and smooth, on the inside and taste wise, they were the real deal. We loved them and these festive treats certainly embody that spirit! To be a better baker means having a deeper understanding of processes and ingredients and while we appreciate the process, we are just as happy supporting our local bakeries when they’re re-opened and buy them there! Shout-out to Tasty whom we got a few ideas from. Believe me, a lot of research went into this before I decided to give this a go! 🌈
Macarons:
1 cup Almond Flour, sifted three times
1 1/2 cups icing sugar, sifted three times
3 egg whites, room temperature
1/2 cup granulated organic sugar
1/2 tsp vanilla extract
1 tsp sea salt
4-5 drops red food colouring
Butter Cream:
1/2 cup unsalted butter, room temperature
1 1/2 cups icing sugar
2 tbsps whipping cream
1/2 tsp vanilla extract
Rainbow Sprinkles for decoration
Instructions:
1. In large bowl, combine 1/2 tsp salt, almond flour and icing sugar. Ensure these are all sifted three times.
2. In separate bowl, beat egg whites and 1/2 tsp salt with handmixer till stiff peaks form. You should be able to flip bowl over and nothing moves. Gradually add granulated sugar.
3. Drop in food colouring and vanilla into egg whites and fold gently with spatula till colour is even.
4. Add flour mixture into egg white mixture bit by bit and combine gently with spatula. When ready, you should be able to lift spatula and draw a “figure 8” with batter.
5. Scoop into piping bag with a circular tip and pipe each corner of baking sheet. Place parchment paper over it, using paste on corners to secure it.
6. Pipe Macaron batter evenly in circles over parchment paper. When done, take baking sheet and tap it on counter 3-5 times gently to rid of air bubbles and even out batter. Distribute sprinkles on-top.
7. Let sit for one hour.
8. Preheat oven at 300°F. Bake for 17-21 minutes depending how large your Macarons are. You’ll know they’re done when they don’t stick to the wax paper.
9. Allow to cool about 20 minutes out of oven and gently use spatula to remove from parchment paper and transfer to a tray. If they stick to paper, peel them off gently, taking a sparing amount of warm water and rub against back of cookie till paper peels off. Be gentle and do not over-wet.
10. Cool in fridge quickly for 20 minutes while you prepare Butter Cream.
11. Whip butter in large bowl till creamy. Add icing sugar, vanilla and cream till you get a thick icing.
12. Scoop into piping bag and pipe onto “foot” of Macarons leaving a bit of space around the edge. Place another Macaron on-top and gently press into a sandwich.
13. Place in air-tight container overnight, room temperature before serving.
Gallery:
(Photo credit: Mr. Will Wong)
For advertising opportunites please contact mrwill@mrwillwong.com